Few things sting like opening a photo you were counting on and finding it soft, smeared, or fuzzy. Maybe your hand moved as the shutter fired. Maybe the light was low and the camera hunted for focus. Maybe the shot was fine, but a messaging app crushed it down to a pixel soup on the way to your phone.
Whatever caused it, the question is the same: can you actually fix it? The good news is that in most cases you can meaningfully unblur an image and pull real detail back out of a shot you thought was ruined. The honest caveat is that not every blur is recoverable, and knowing the difference saves you hours of frustration.
This guide walks you through what blur really is, which types respond to editing and which don't, the fastest AI-based way to sharpen a photo, the manual methods pros still use, and how to squeeze the cleanest possible result out of whatever file you have.
Table of Contents
- Why images blur
- The fast AI way to unblur an image
- Manual and traditional methods
- Upscaling versus unblurring
- Getting the best possible result
- Exporting and real-world use cases
- A quick quality-assurance checklist
<a id="why-images-blur"></a>
Why images blur
Before you can fix a blurry photo, it helps to know what "blur" actually is. Blur is lost or misplaced high-frequency detail. Sharp edges, fine textures, and crisp lines are all high-frequency information, and blur is what happens when that information gets averaged across neighboring pixels instead of staying where it belongs. Different causes smear that detail in different ways, and the cause dictates how much you can recover.
Motion, focus, and resolution blur
There are three culprits behind almost every soft photo, and they behave differently.
Motion blur happens when the camera or the subject moves while the shutter is open. You will see it as directional streaking, where lights turn into short lines and edges trail in one direction. Because the smear follows a consistent path, motion blur is often surprisingly recoverable when the movement was small and steady.
Focus blur (soft focus) happens when the lens locks onto the wrong distance, so your subject sits outside the plane of sharpness. It looks uniform and dreamy rather than streaked. Mild focus miss is fixable; a badly out-of-focus shot where the eyes have no defined edges at all is much harder.
Resolution and compression blur is the quiet killer. The photo was captured fine, but it got downscaled, re-saved as a low-quality JPEG, or screenshotted and forwarded until the fine detail simply is not in the file anymore. This is less about "focus" and more about missing pixels, which is why upscaling tools often matter here as much as sharpening.
What is fixable and what is not
Set expectations early and you will be happier with the outcome. Photos that respond well to editing include slightly soft portraits, mild camera shake, screenshots and social-media re-compressions, old scanned prints, and images that are simply too small. In all of these, enough real structure survives that software can reconstruct believable detail.
Photos that resist recovery include severe motion blur where a face has become a long streak, shots so out of focus that eyes and text have no discernible edges, and images that are both tiny and heavily compressed. When the underlying information is truly gone, no tool can invent the exact original, though modern AI can produce a plausible, better-looking version. The rule of thumb: if you can still make out the shapes and edges, you can probably improve them.
<a id="the-fast-ai-way-to-unblur-an-image"></a>
The fast AI way to unblur an image
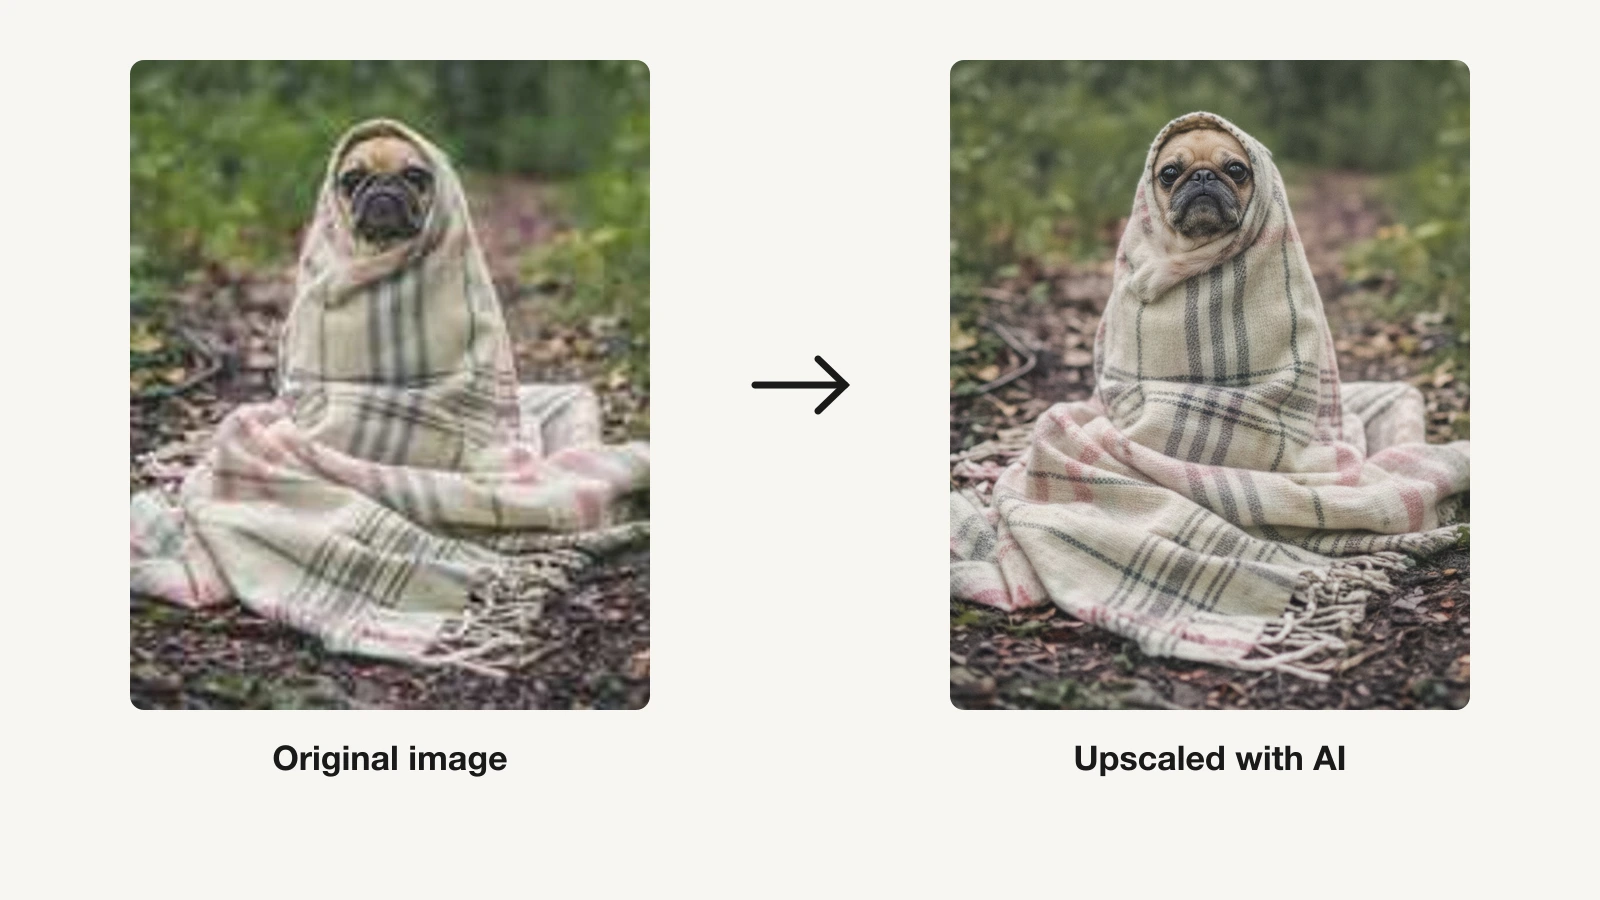
The quickest, most reliable method today is an AI-based tool that was trained on millions of sharp-and-blurry image pairs. Instead of nudging a global slider, it recognizes what an eyelash, a brick, or a letterform is supposed to look like and rebuilds those edges intelligently. ClipNova's Unblur Image tool does exactly this, right in your browser, with no software to install.
Step by step
Here is the whole workflow, start to finish:
- Open the Unblur Image tool in your browser. There is nothing to download.
- Upload your blurry photo by dragging it in or selecting it from your device. Use the largest, least-compressed version of the file you have.
- Let the AI process the image. It analyzes the blur, restores edges, and rebuilds fine texture automatically, usually in seconds.
- Compare the before and after. Check the areas that matter most first: eyes, teeth, text, and any hard edges where over-processing shows up quickest.
- Download the result. Save the full-resolution output and keep your original file untouched in case you want to try a different approach later.
That is it. No masks, no layers, no sliders to babysit. For most everyday blur, this single pass gets you a shareable, print-ready photo faster than it would take to open a desktop editor.
Why AI beats a slider
Traditional sharpening is blunt: it increases contrast along every edge it can find, whether that edge is real detail or random noise. AI restoration is contextual. It effectively asks "what was probably here?" and reconstructs texture that matches, so skin stays smooth while eyelashes get crisp. That is the difference between a photo that looks sharpened and one that looks like it was simply shot in focus. It also handles mixed problems, like a soft photo that is also a little noisy and a little compressed, in one step instead of three.
<a id="manual-and-traditional-methods"></a>
Manual and traditional methods
AI is the fast lane, but it helps to understand the manual techniques, both because you will meet them in every desktop editor and because knowing their limits tells you when to stop fighting a slider and reach for a smarter tool.
Sharpen and unsharp mask
Every editor from Photoshop to basic phone apps ships with a Sharpen filter and an Unsharp Mask. Despite the name, unsharp mask is a sharpening tool: it creates a blurred copy of your image, compares it to the original, and boosts contrast wherever the two differ, which is precisely along edges. You typically get three controls:
- Amount controls how strong the contrast boost is.
- Radius controls how wide the sharpened halo around each edge extends.
- Threshold controls how different two areas must be before sharpening kicks in, which protects smooth areas like skin and sky from getting noisy.
A close cousin, Smart Sharpen, adds blur-type awareness and can target Gaussian, lens, or motion blur specifically. Used gently, these tools genuinely help mildly soft images and cost you nothing.
Where manual sharpening breaks down
The catch is that sharpening does not add detail. It only exaggerates the edges that already survived. Push it and three problems appear: bright and dark halos ring every edge, existing noise and JPEG artifacts get amplified into a gritty mess, and fine textures start to look crunchy and artificial. Manual sharpening also cannot invent resolution, so it does nothing for a photo that is simply too small. For anything beyond a light touch-up, this is the ceiling, and it is exactly where AI reconstruction and upscaling take over. For a side-by-side look at the tools that do this well, see our roundup of the best AI photo enhancers.
<a id="upscaling-versus-unblurring"></a>
Upscaling versus unblurring
These two often get confused, and using the wrong one wastes your time. Unblurring restores edge sharpness and detail that got smeared. Upscaling increases pixel dimensions and reconstructs new detail so a small image can be enlarged without turning into mush. They solve different halves of the "my photo looks bad" problem, and plenty of images need both.
If your photo is a reasonable size but soft, you want unblurring. If your photo is sharp-ish but tiny, or you need it much larger for print, you want an AI Image Upscaler to add resolution first. If it is both small and blurry, which is the usual reality with old or forwarded photos, you often want both in sequence. To enlarge a photo without losing quality, run it through ClipNova's AI Image Upscaler.
When to upscale first
Order matters. As a general rule, upscale before you unblur when the image is very small, because giving the sharpening step more pixels to work with produces cleaner edges and fewer artifacts. When the image is already a decent size and just soft, skip straight to unblurring. And if a subject was shot against a busy background you want to drop, running Background Removal after you have restored the detail keeps the cut-out edges crisp rather than fuzzy.
<a id="getting-the-best-possible-result"></a>
Getting the best possible result
Two habits separate a genuinely restored photo from one that merely looks over-processed. Both come down to respecting the information you actually have.
Start from the highest-resolution source
Always feed the tool the best file you own. That means the original camera file rather than a screenshot of it, the version straight from your library rather than one that survived a group chat, and the largest copy rather than a thumbnail. Every time an image is re-saved as a JPEG, forwarded, or screenshotted, it sheds detail permanently. If the good original lives on an SD card, a cloud backup, or the device that took it, retrieving it will beat any amount of software cleanup on a degraded copy. Garbage in, garbage out is doubly true for restoration.
Avoid over-sharpening halos
The single most common mistake is pushing sharpness until it screams. The tell is a bright or dark outline hugging every high-contrast edge, most visible against skies, walls, and skin. Halos read as fake instantly and get worse when the image is compressed again for the web. With AI tools this is largely handled for you, but if you layer manual sharpening on top, do it lightly and view the image at 100 percent while you work, not zoomed out where problems hide. Restore until the photo looks like it was shot in focus, then stop. The goal is a natural photo, not a sharpened one.
A few more quick wins: fix exposure and white balance before sharpening so you are not amplifying a color cast, work on a copy so your original stays safe, and tackle heavy noise first, since sharpening noise just gives you crisp noise.
<a id="exporting-and-real-world-use-cases"></a>
Exporting and real-world use cases
Once your image looks right, export it with its quality intact. Save at full resolution and choose a high-quality setting; if the platform allows PNG for graphics or text-heavy images, use it, and reserve high-quality JPEG for photographs. Avoid re-saving the same JPEG over and over, because each pass compounds compression loss.
Where does a freshly unblurred photo actually earn its keep? Everywhere a sharp image matters:
- E-commerce and marketplace listings, where crisp product shots directly affect whether people buy.
- Profile pictures and portfolios on LinkedIn, Instagram, and personal sites, where softness reads as unprofessional.
- Real estate and event photos, rescuing a one-time shot you cannot recapture.
- Thumbnails and social posts, where a sharp frame stops the scroll.
- Old family and scanned photos, restoring memories that were never sharp to begin with.
- Documents and whiteboards, making faint or fuzzy text legible again.
Because ClipNova is a full AI content platform, the same restored image can flow straight into your video projects, thumbnails, and graphics without hopping between apps. Plans start at $19/mo, with higher tiers adding volume.
<a id="a-quick-quality-assurance-checklist"></a>
A quick quality-assurance checklist
Before you call a photo done, run through this fast QA pass. It catches the mistakes that only show up after you have already posted the image.
- View at 100 percent. Judge sharpness at full size, not zoomed out where blur hides.
- Check the eyes and text first. These are where restoration succeeds or fails most visibly.
- Hunt for halos. Scan high-contrast edges against sky, skin, and walls for bright or dark outlines.
- Look for amplified noise. Make sure smooth areas like skin and backgrounds did not turn grainy.
- Compare against the original. Confirm the result genuinely looks better, not just different.
- Confirm the resolution. Verify the export is large enough for its destination, and upscale first if it is not.
- Save a clean copy. Keep your untouched original so you can re-edit later if needs change.
If it passes all seven, you are ready to publish.
Blurry photos feel like a lost cause, but most of them are not. When you match the method to the cause, start from the best source you have, and stop before you over-sharpen, you can rescue shots you had written off. The fastest path is to let AI do the heavy lifting: upload your photo to ClipNova's Unblur Image tool, let it restore the detail in seconds, and download a crisp, ready-to-use result. Try it on that one photo you have been meaning to fix.
Related reading: 8 best AI image combiners in 2026.
Frequently asked
Can you really unblur an image, or is it a myth?
Yes, you can genuinely unblur many images, especially those with mild motion blur, soft focus, or compression damage. AI tools reconstruct edges and texture that survived in the file. The limit is severe blur where the underlying detail is truly gone, which no tool can fully invent.
What is the easiest way to unblur a photo?
An AI-based tool like ClipNova's Unblur Image tool is the fastest option. You upload the photo, let it restore the detail automatically in your browser, and download the result with no software to install. It handles most everyday blur far better than manual sharpening sliders.
Why does sharpening make my photo look worse?
Manual sharpening exaggerates existing edges rather than adding real detail, so pushing it too far creates bright and dark halos and amplifies noise and JPEG artifacts. Keep the amount low, use a threshold to protect smooth areas, and view the image at 100 percent while editing. For heavier cases, AI restoration produces cleaner results.
What is the difference between unblurring and upscaling?
Unblurring restores sharpness and detail that got smeared, while upscaling increases the pixel dimensions of a small image and reconstructs new detail. If your photo is a decent size but soft, unblur it; if it is sharp but tiny, upscale it first. Photos that are both small and blurry often need both steps in sequence.
Why do photos from messaging apps look so blurry?
Messaging apps compress and downscale images to save bandwidth, stripping out fine detail each time a photo is sent, forwarded, or screenshotted. That is compression blur, not focus blur. Whenever possible, retrieve the original file from the device or cloud backup, since restoring from the best source always beats cleaning up a degraded copy.